Lightweight Veneers Install Guide
Lightweight Veneers Insallation Guide
Congratulations on your choice of Artisan Masonry Stone Thin Veneer. Artisan Veneers provide your new construction and remodel projects with the distinctive look of natural stone. Artisan Masonry Stone Thin Veneer products offer quick and easy installation for both interior and exterior applications. This lightweight aggregate stone also provides unmatched strength and durability not typically found in stone veneers.
FEATURES AND BENEFITS
Artisan Masonry Stone Thin Veneer is very different from most stone adhered veneers because of the increased durability and product dimensionality.
a. Color is throughout the product, not just surface color
b. Increased freeze thaw resistance / low water absorption rate
c. Product is designed to fit which quickens install time
d. Product is dimensionally tolerant and avoids unwanted flanges on the back of stone
e. Superior compressive strength to typical adhered veneers
f. Product is manufactured with an integral water repellent
g. Increased resistance to salt damage
h. Easy to clean without surface damage
ESTIMATING MATERIALS
Artisan Masonry Stone Thin Veneer is sold by the square foot. To estimate the quantity of material needed for your project you simply take the total area to be covered minus any openings (windows, doors, fireplace etc.). Artisan Masonry Veneer does not require special corner pieces; corners are constructed by overlapping standard pieces in a woven pattern. Refer to Figure 6 on page 7.
ENSURING LABOR QUALITY AND FOLLOWING SAFETY REQUIREMENTS
Installing Artisan Masonry Stone Thin Veneer requires the use of the adequate tools and materials, proper labor standards and special care for details. Following the appropriate procedures in every step of this installation guide and taking enough time to complete in detail each one of them will help maintain the quality standards this product complies with and make it last for many years. Contact local authorities in your area and check on up-to-date local Building Code requirements or standards available for a proper installation. Always follow the manufacturer’s installation instructions for every item before starting your application. ASTM C1780 standard should also be considered as an important reference for installing Masonry Stone Thin Veneer.
This guide includes, in the tools and materials section, a set of elements to be used on the jobsitein order to help meet safety standards during the installation process. However, check local, state, and federal codes for additional jobsite safety requirements before beginning the installation.
INSTALLATION OVER WOOD FRAMING
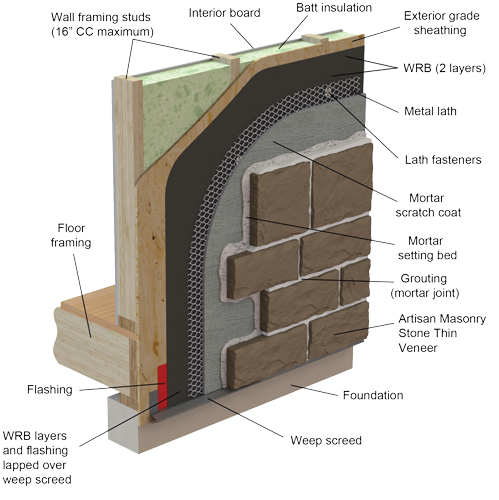
In the most typical Artisan Masonry Stone Veneer installations, you will be installing the product on an exterior non-masonry surface, like wood framing. In this case, wall assemblies should use 11 ⁄2” x 31 ⁄2” wood studs, spaced no more than 16” CC and covered by a 7 ⁄16” thick OSB or rigid sheathing.
Tools and materials required for installation
Before beginning the installation process, you will need the following tools and materials (apart from the stone):
- Weather resistive barrier (WRB) (the most common is WRB #15 felt)
- Corrosion resistant metal lath (2.5 or 3.4 lb/ft 2), complying with ASTM C 847
- Corrosion resistant screws & washers (complying with ASTM C1063) or coated roofing nails.
- Scratch Coat Mortars – Type S or type N mortar complying with ASTM C270
- Setting Bed and Pointing Mortars – Type S or type N mortar complying with ASTM C270; for freeze and thaw regions we recommend AmeriMix Polymer Modified® Stone Veneer Mortar or equivalent
- 6” flashing
- Weep screed
- Masonry trowel
- Hammer
- Level
- Guillotine or diamond blade
- Circular saw
- 1 ⁄2” staples
- Mixing hoe
- Staple gun or tack hammer
- Tuck point
- Wheel barrow or mixing pan
- Metal snips
- Spray bottle
- Safety glasses
- Dust mask
PREPARATION
For the tight fit installation, no mortar is applied in the joints. The only existing bond is created between the stone and the wall. Refer to Steps 1 to 7 for a detailed description on the tight fit configuration. For grouted application, mortar is applied inside the joints remaining between stones. Refer to Steps 1 to 8 for this type of application.
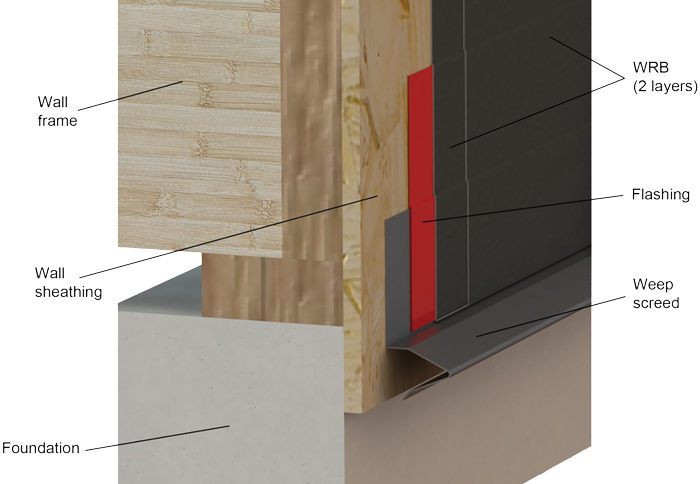
Step 1: Weep screed
The first step is to install the weep screed, which must be attached to the bottom part of the exterior sheathing, at least 4” above grade, and should have 3 ⁄16” diameter weep holes (spaced not less than 33” CC).
Step 2: Flashing
The 6” flashing should be applied over the sheathing, fully overlapping the vertical portion of the weep screed.
Step 3: WRB (Weather Resistive Barriers)
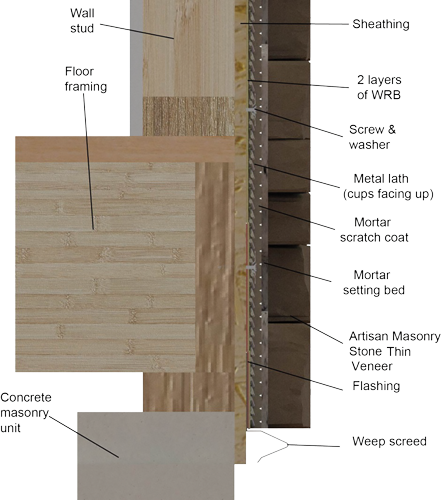
In this type of application two layers of Weather resistive barrier (WRB) are required. The WRB should be installed in two separate layers starting at the bottom of the wall (overlapping the weep screed) and working upward, using staples to attach them to the wall. The WRB should overlap horizontally 2” to 4” and vertically a minimum of 6” in shingle fashion. Inside and outside corners must be overlapped a minimum of 16”. It is very important to wrap all corners with WRB layers and to overlap both of them on the flashing previously installed, as shown in Figure 1.
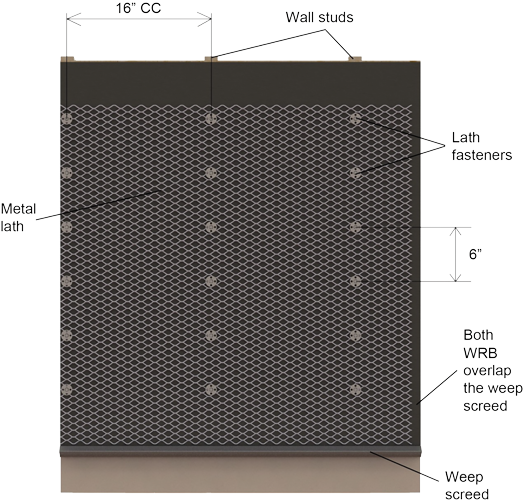
Step 4: Metal lath
The metal lath should be applied over the WRB layers in a horizontal fashion and overlap 1” to 2” at both the horizontal and vertical seams. The lath also needs to wrap inside and outside corners a minimum of 12”, and should be fastened every 6” CC vertically on each stud and spaced horizontally by 16’’ CC maximum (see Figure 2). Lath cups (the protrusions that help keep mortar coat in place) should face up, so that it will feel rough when running your hand up the wall, and smooth in the opposite direction, if properly installed. To attach the lath to the wall, use corrosion resistant screws or nails which should penetrate 3 ⁄4” minimum in wood studs. It is very important that the lath wraps the corner in a continuous fashion; never leave a seam on a corner.
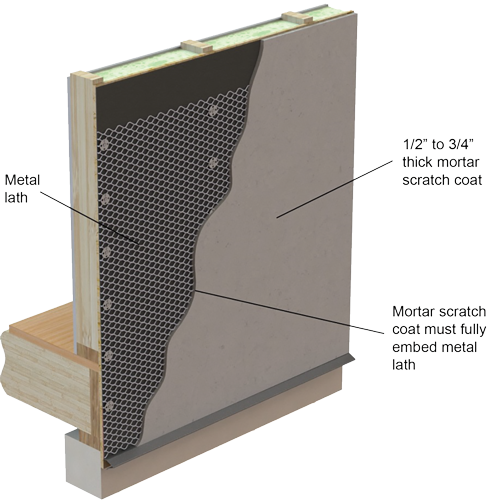
Step 5: Applying mortar coat over lath and scratching
Use the masonry trowel or notched tile trowel to spread the mortar over the entire lath, approximately 1 ⁄2” to 3 ⁄4” thick (see Figure 3). After applying the scratch coat no lath material should be visible. Once the mortar is thumbprint hard, a stiff bristle brush or scratch rake can be used in horizontal motion to create a rough surface. After having applied and scratched the mortar, allow for the scratch coat to cure 48 hours before installing stone veneer.
APPLICATION
Step 6: Preparing Installation of Artisan Masonry Stone Thin Veneer
Before installing Artisan Masonry Stone Thin Veneer, lay out several layers of stone from the pallet to ensure good color blending. If your job is large enough, make sure to pull product from multiple pallets during install. When installing the veneer, be sure to water mist the scratch coat and the back of the stone (by using spray bottle), especially during warm temperatures.
Step 7: Applying mortar on stone and installing
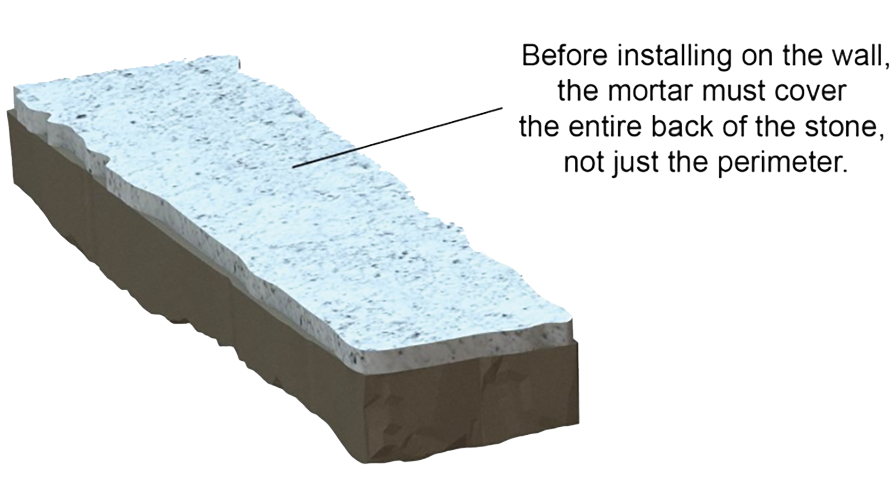
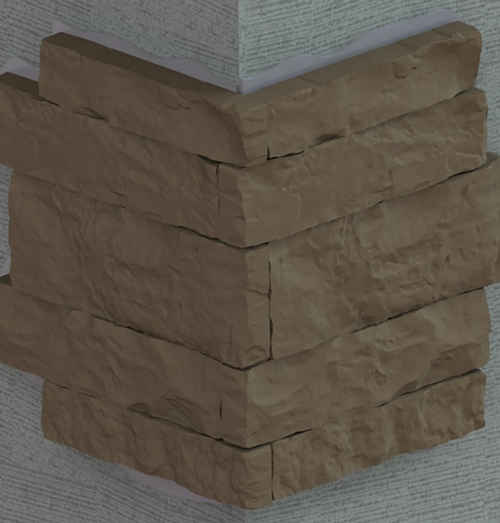
Apply mortar to the entire back surface of the stone to ensure 100% adhesion to the projected surface, since there will be no bond between stones. DO NOT apply mortar in a ring or donut pattern, this limits bond strength. When installing product be sure to firmly press the veneer onto the scratch coat and slide the product back and forth slightly until mortar squeezes out around the perimeter of the stone, until the setting bed thickness reaches 1” nominal (Figure 4). If a stone is disturbed to the point in which the bond to the wall is broken, it is important to clean the mortar off and restart the installation process. When installing stone on an inside corner, stones can be woven or ship lapped with product alternating courses, as shown in Figure 5.
Artisan Masonry Stone Thin Veneer can easily be snapped with a guillotine blade. Snapping the material does not show unsightly aggregate or generate any dust. A power saw with diamond blade can also be used. The edge of a masonry trowel can be used to rough up cut edges which will restore a natural look to the stone. Figure 6 shows a front view of all components being installed in a tight fit installation over wood framing.
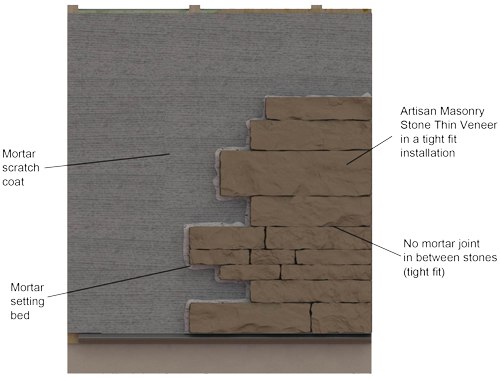
Figure 7 shows a cut isometric view of all components being installed in a tight fit installation over wood framing.

Step 8: Grouting joints (for Grouted application)
Grouting the joints should be made only after stone mortar has cured enough. Use Type-S mortar and the grout bag to apply mortar in the joints. The mortar should fill in all clearances in between the stones, and should match or overlap the surface of the stone. Once the mortar is thumbprint hard, remove mortar excess from the joints with the jointing tool. Then use the soft bristled brush to clean stone surfaces and to smooth joints to a uniform surface. Do not wet brushes to clean uncured mortar, it will smear off. Figure 8 shows a front view of all components being installed in a grouted installation over wood framing.
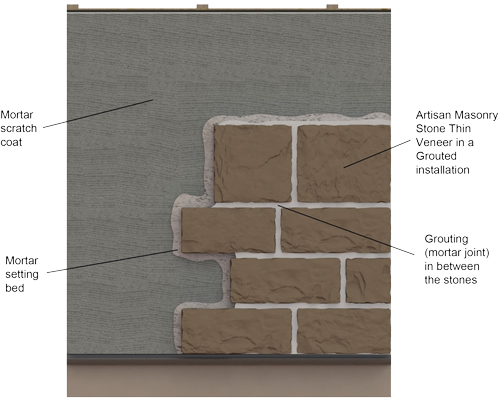
Figure 9 shows a cut isometric view of all components being installed in a grouted installation over wood framing.
INSTALLATION WITH EXTERIOR CONTINUOUS INSULATION LAYER
The installation with an Exterior continuous insulation has been conceived in order to meet and even exceed new energy code requirements. It involves installing a rigid foam sheathing or layer, in order to reduce heat loss, allow for continuous and uniform insulation and thus improve energy efficiency in the system. However, these new requirements call for an improved solution for attachment of the wall covering: the use of fastening nails or screws, which should penetrate a minimum of 1¼” in the wood studs. Figure 10 and 11 show how the Stone Thin Veneer installation assembly would look with the Exterior continuous insulation layer (using a 1” thick insulation layer):
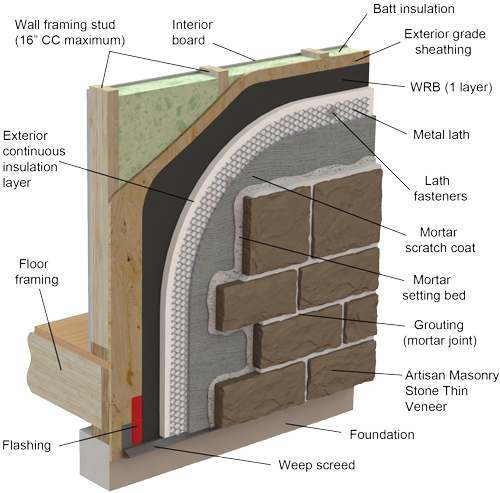
The rigid foam sheathing for the exterior insulation installation should be installed between the WRB and the metal lath. For this case, the inner WRB layer might be replaced by the Insulation layer. In order to determine its specifications, there are some items to consider:
- Installation condition: the fastening system used to attach the foam sheathing to the wall might be the same one that attaches the lath to the studs as well.
- Cladding system weight: the fastening system will hold in place both the lath and the foam sheathing.
- Proper fastener size and spacing: the screw or nails used to fasten the whole system must penetrate a minimum of 1¼” into the wood studs, and spaced 16” horizontally and 6” vertically.
- Ensure fasteners are available in the needed length.
- Installation process: between the inner WRB and the lath.
GENERAL TIPS
- Before installing Artisan Masonry Stone Thin Veneer, once the scratch coat and the back of the stone veneer have been properly moistened, allow extra water to dry out from the surface of the scratch coat and make sure there’s no water film on it.
- Installing Stone Thin Veneer from the top down the wall will help prevent mortar from dripping on applied stones, minimizing cleanup.
- To test mortar consistency, it should hang from trowel when held at a 90 degree angle.
- After having applied and scratched the coat, recall that the scratch coat should cure for 48 hours before installing stone veneer.
- Environmental conditions during installation should not go beyond 90°F (32°C) or below 39°F (4°C). For hot weather applications, and if the surface used for installation is exposed to direct sunshine, frequent moistening of surfaces may be required.
Stay Connected
Get the latest news and information from Echelon by signing up to receive our monthly newsletter.