Full-Depth Stone Veneer Installation: A Complete Guide
Full Depth Veneer Installation Guide
Ensure project success by familiarizing yourself with full-depth veneer products and their installation procedure using this guide! We’ll use Echelon Masonry’s Artisan Stone Veneer® line for our examples and calculations. Reach out to your local technical sales representative to discuss installation tips and techniques specific to your project. For information on thin veneer installation check out this guide.
CALCULATING STONE VENEER QUANTITIES
Stone veneer is usually sold by the square foot including joints. To estimate the quantity of material needed for your project you simply take the total area to be cladded minus any openings (windows, doors, fireplace etc.). It is recommended to add 3% for simple waste and 5% – 7% for areas where more cuts will be required.
ENSURING LABOR QUALITY AND FOLLOWING SAFETY REQUIREMENTS WHEN INSTALLING STONE VENEERS
Installing stone veneer requires the use of adequate tools and materials, proper labor standards, and special care for details. Following the appropriate procedures in every step of this installation guide and taking enough time to complete in detail each one of them will help maintain the quality standards this product complies with and make it last for many years. Contact local authorities in your area and check on up-to-date local building codes and NCMA standards for a proper installation. Always follow the manufacturer’s installation instructions for every item before starting your application. Provide a mock-up for evaluation of product and application workmanship, by using a 48” by 48” panel of units of the color to be used in the project (to illustrate stone masonry units, coursing, anchorage, mortar joints and color, pattern of finished wall and control joints).
HOW TO SHIP AND DELIVER STONE VENEER
The following items should be considered to properly ship, store and handle the product before installation:
- Deliver mortar materials in original unbroken, undamaged packages with manufacturers’ labels intact and visible.
- Store off the ground and undercover until used on the work.
- Store or pile sand on a plank platform and protect from dirt and rubbish and thus prevent deterioration or contamination.
- Deliver masonry units banded on pallets with protective pallet covers (stretch wrap) to prevent damage.
- Lift skids with proper and sufficiently long slings or forks with protection to prevent damage to units. Protect edges and corners.
TYPES OF STONE VENEER AND INSTALLATION PATTERNS
Full depth Artisan Stone Veneer® is a modular masonry veneer with a wide variety of stone sizes, which allows customizing the appearance of each installation. All stones are approximately 3 ½” in depth and mortar joints vary from 3/8” to 1/2”. There exist four (4) different products offered by Oldcastle Architectural that can be classified as full depth Artisan Stone Veneers: Waterford Stone™ Dufferin® Stone Lamina® Stone Cinco® Brick
Waterford Stone
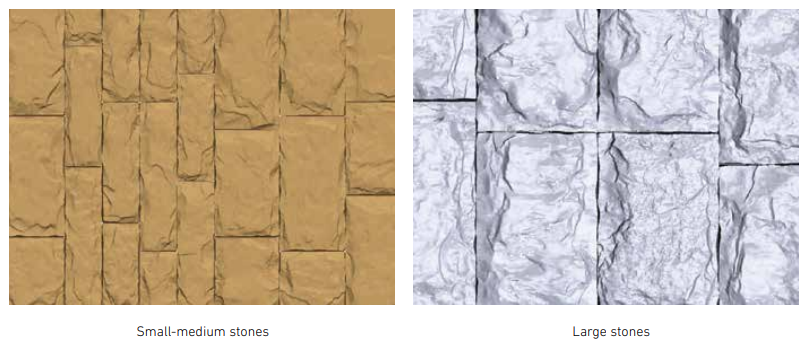
This product is sold in 3 different sizes: small, medium and large stones. Product heights of 4” and 7” palletize product (small and medium) has seven and eight different lengths, respectively, while the 11 ½” product (large) has six varied lengths.
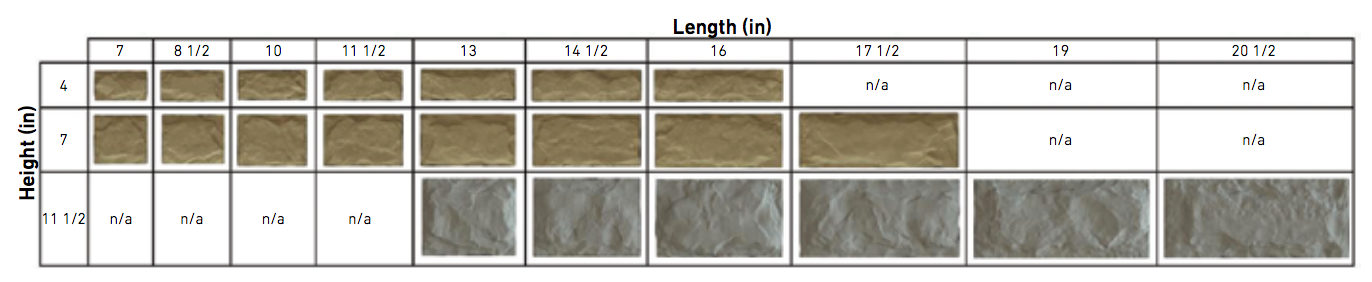
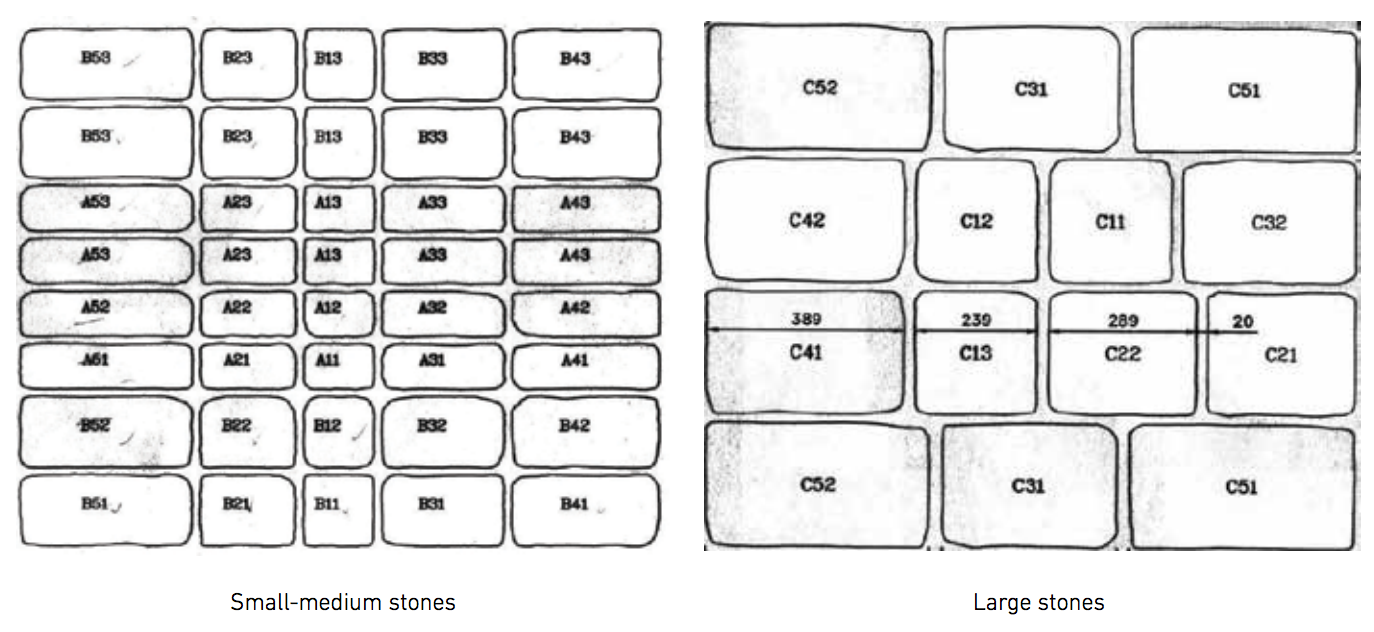
All stones are approximately 3 5/8” deep and are installed with a ½” mortar joint. The following images show the layouts for small-medium (4 and 7”) and Large (11 ½”) Waterford Stones, after stone clamping (stones put together). Packaging in the corresponding pallets is made as per these layouts:
When ordering and installing Waterford Stone, you may work on your wall coverage by blending large and small-medium stones, as per the desired percentage of large stones. For example, to achieve a 25% large stone pattern (1 out of 4 stones is a large stone), you will need one large stone pallet (11 ½”) and three small-medium stone pallets (4” and 7”).
Dufferin® Stone
This product is sold in 3 different sizes: small, medium and large stones. Product heights of 90 and 140 mm (small and medium) and 240 mm (large) are each available in five different lengths in 50 mm increments.
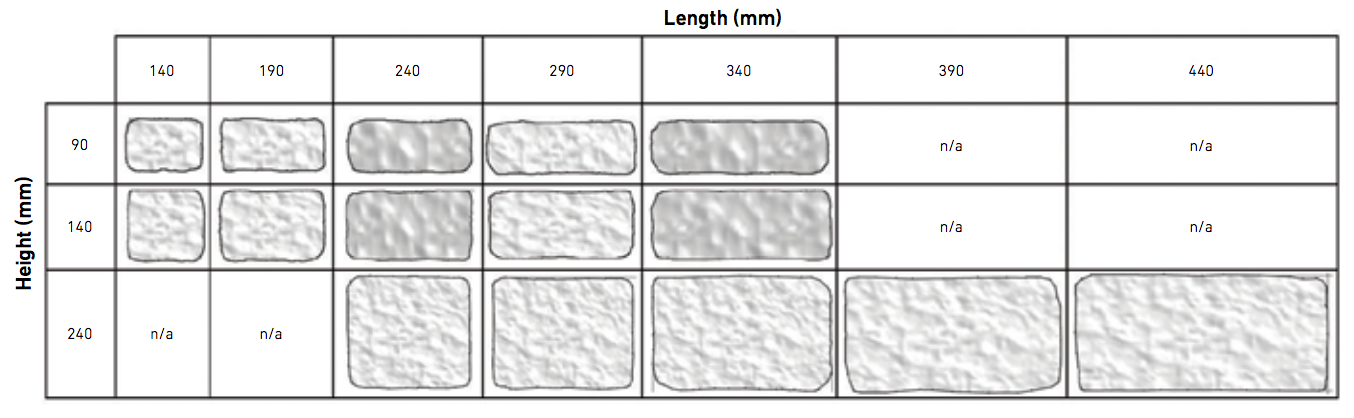
All stones are approximately 90 mm in depth and are installed with a 10mm joint. The following images show the board layouts for small-medium (90 and 140mm) and Large (240mm) Dufferin Stones as they are produced (before packaging in pallets):
When ordering and installing Dufferin Stone, you may work on your wall coverage by blending large and small-medium stones, as per the desired percentage of large stones. For example, to achieve a 25% large stone pattern (1 out of 4 stones is a large stone), you will need one large stone pallet (240mm) and three small-medium stone pallets (90 and 140mm).
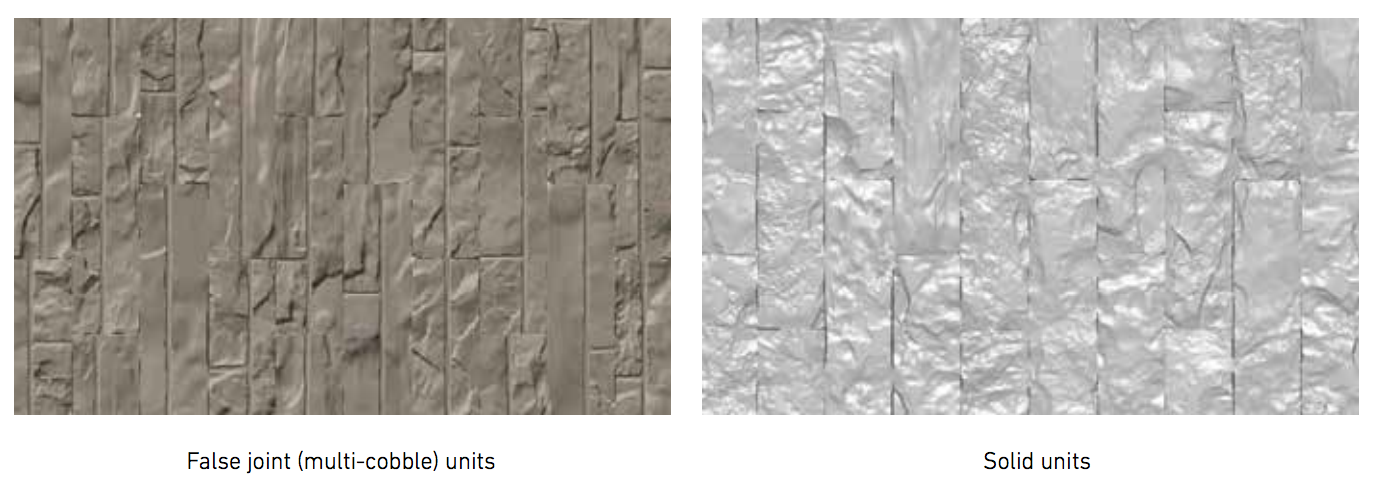
Lamina® Stone This product is 4” high with separately palletized false joint (multi-cobble) and solid units of varying lengths. All stones are approximately 3 5/8” in depth:

The 3/8” mortar joint used for this stone should be raked to the depth of the false joints. There is no need to fill the false joints with mortar. Approximately 30% of each false joint stretcher pallet will consist of false joint return corner units. The following images show the layouts for false joint units (multi-cobble) and solid units, after clamping (stones put together). Packaging in the corresponding pallets is made as per these layouts:
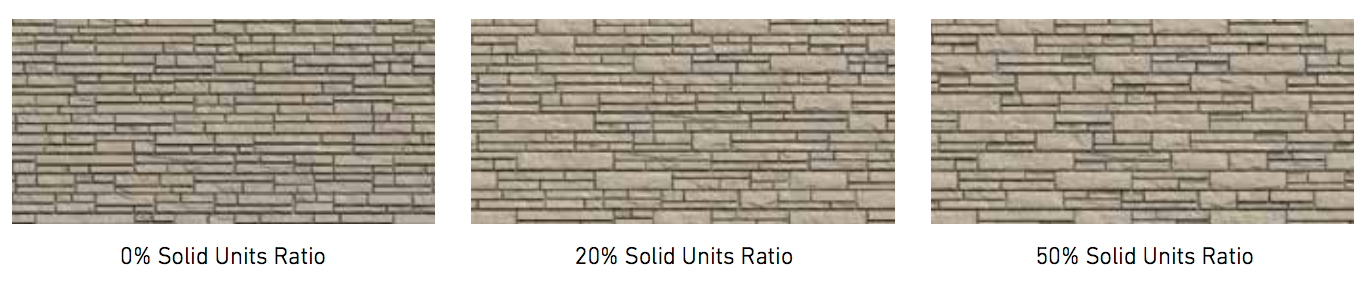
When ordering and installing Lamina Stone, you may work on your wall coverage by blending false joint and solid units, as per the desired percentage of solid stones, as follows:
Cinco® Brick
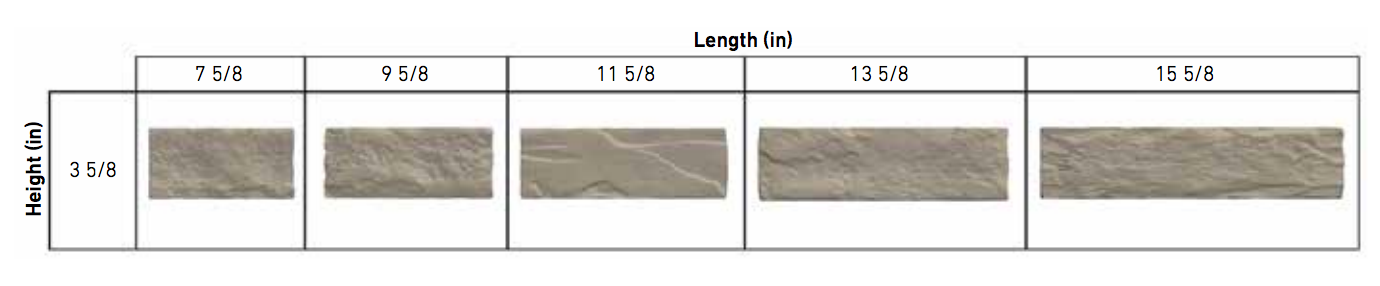
This product is 90mm (approximately 3 1/2”) deep with one single height of 3 5/8” of varying lengths:
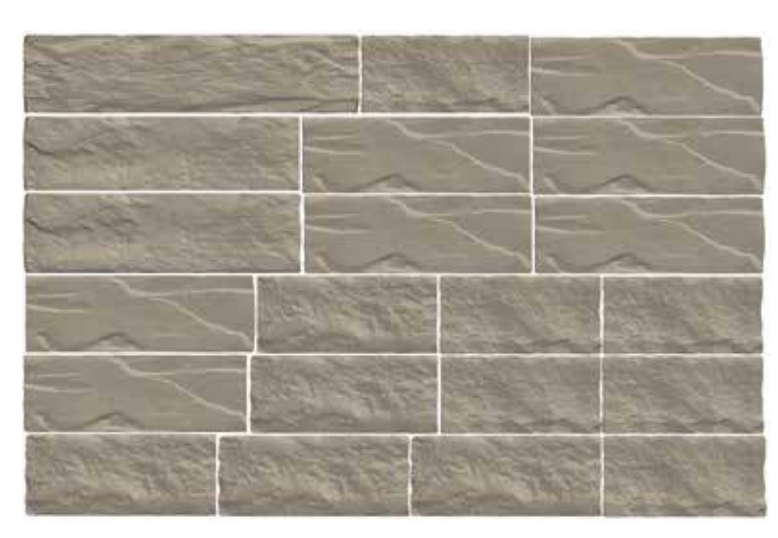
All stones are installed with a 3/8” mortar joint. Packaging in the corresponding pallets is made as per the following layout:
HOW TO INSTALL STONE VENEER
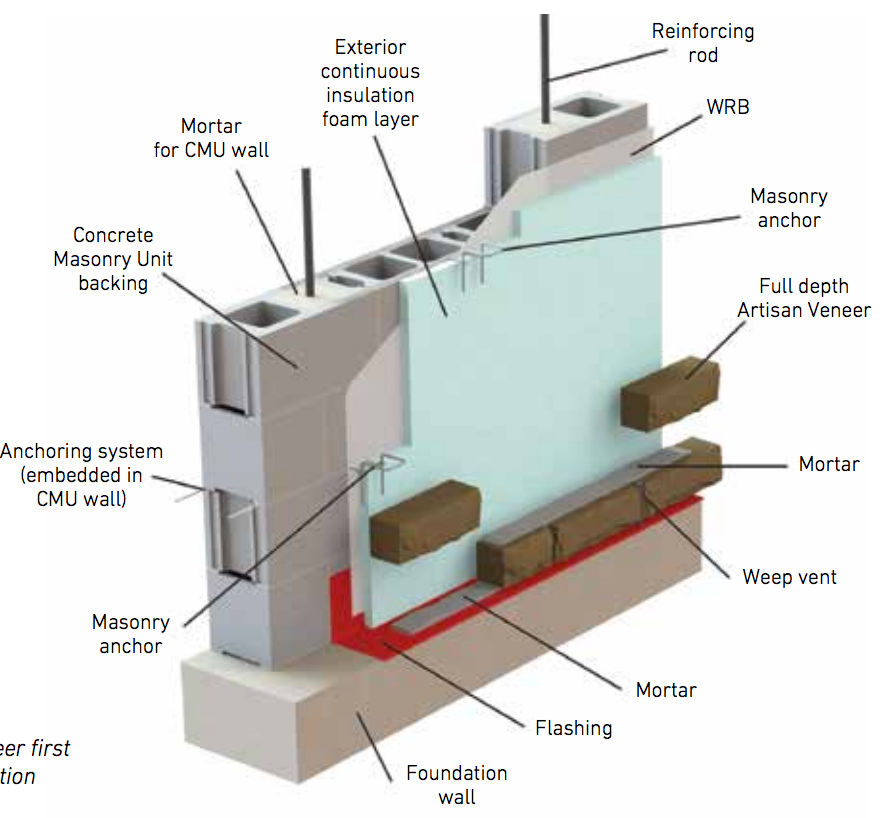
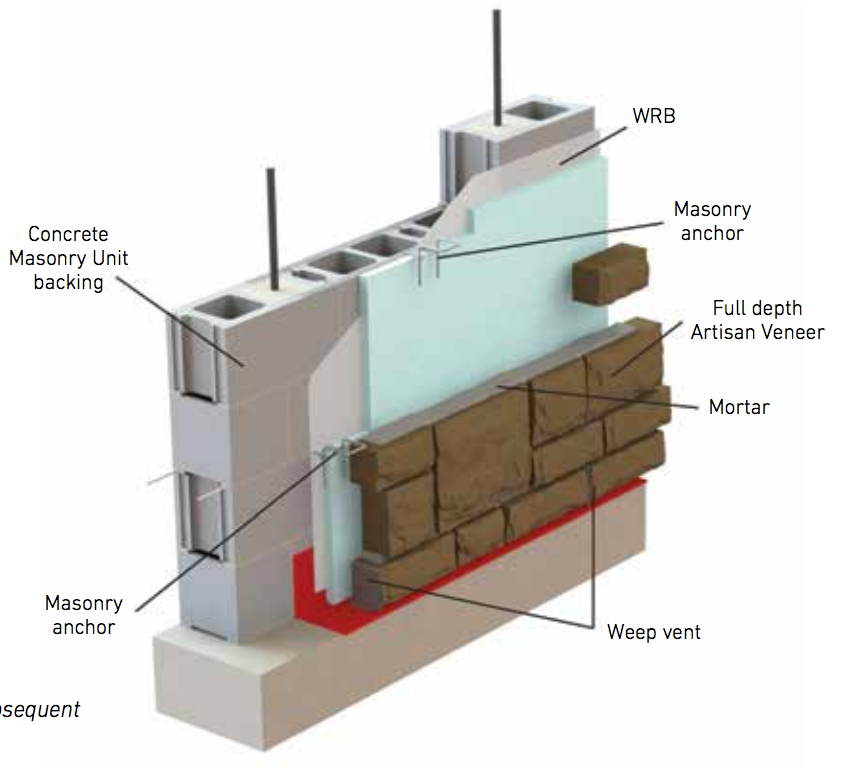
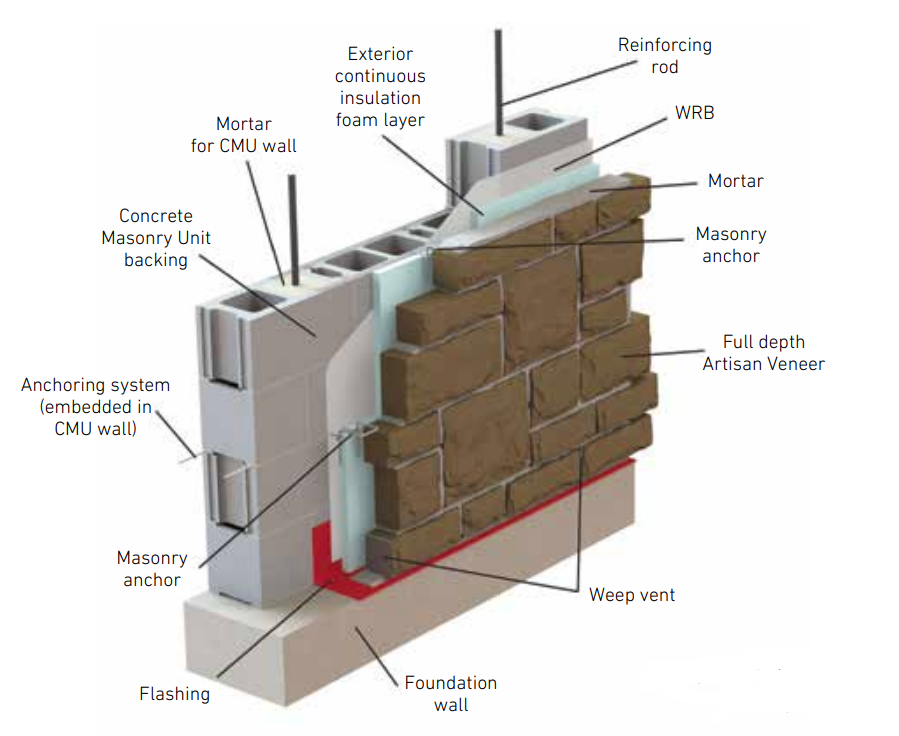
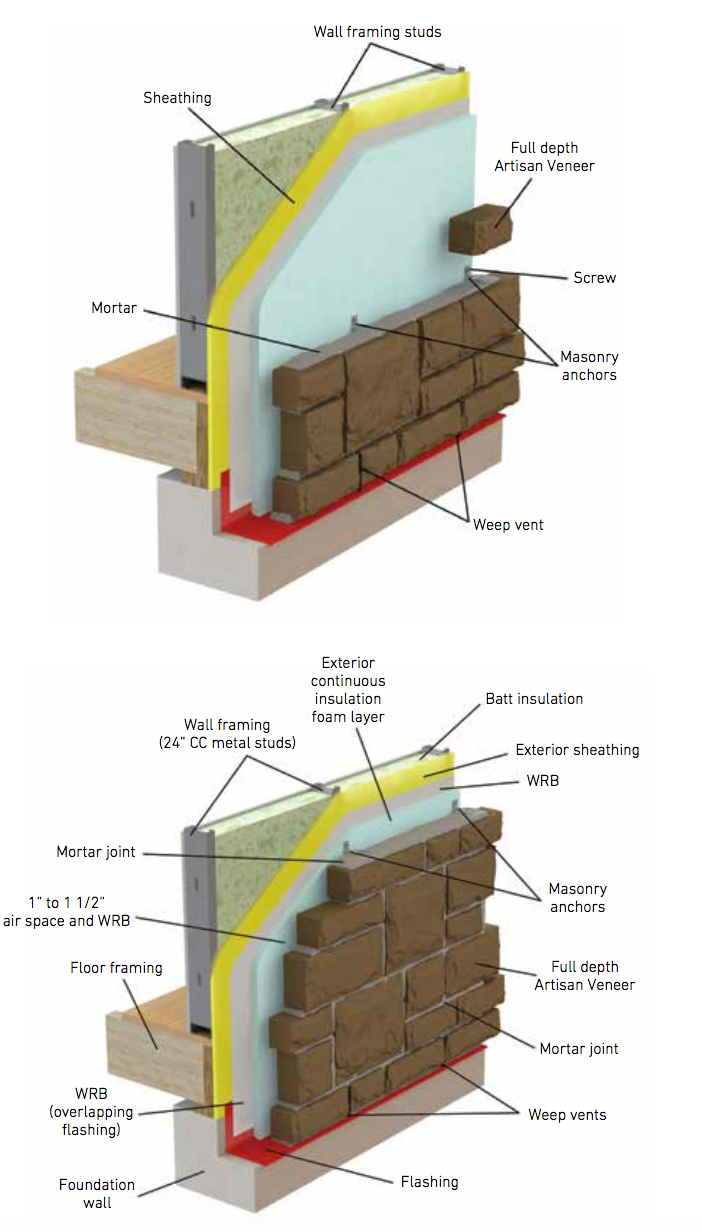
Installation on a Concrete Masonry Unit (CMU) backing
A full-depth masonry veneer requires a footing or a ledge for installation. A 1” to 1½” airspace is recommended between the insulation layer and the stone. The wall is built with 8”x8”x16” CMU blocks, using 3/8” mortar joint, reinforcement rods and a horizontal joint reinforcement with eye & pintle wall masonry anchors (embedded in the mortar).
As with different brick sizes, the depth of the exterior trim and footing or ledge will need to allow adequate depth for the stone plus air space (typically 4½” to 5”). Consult your local building code for specific requirements on footing/ledge and air space.
Materials and tools required
- Weather resistive barrier (WRB) (the most common is WRB #15 felt)
- Type S or type N mortar complying with ASTM C270; for freeze and thaw regions we recommend AmeriMix Polymer Modified® Stone Veneer Mortar or equivalent.
- Masonry anchors for CMU backing
- Flashing
- Weep vents: Molded polyvinyl chloride insect-resistant grilles.
- Masonry trowel
- Guillotine or diamond blade
- Mason’s saw or chisel
- Circular masonry saw
- Mixing hoe
- Tack hammer
- Tuck point
- String line
- Wheel barrow or mixing pan
- 4’ level
- Corner poles
- Metal jointing tool
- Soft bristle brush
- Safety glasses
- Dust mask
- Hard hat
HOW TO PREPARE TO LAY STONE VENEER
Flashing
Flashing should:
- Be applied over the sheathing on both vertical and horizontal portions of the wall (see Figure 1)
- Project out of the horizontal surface of the foundation by ¼”.
- Be installed at locations shown in the plans and in strict accordance with the details and the best masonry.
Install through-wall flashing over exterior windows, relieving angles, doors, tops of walls, at the inside base of cavity walls, and under sills. Extend ends of sill flashing beyond jamb line and turn up into wall to create an end dam to divert moisture toward the wall face. Extend flashing over veneer, turn up minimum 8” and bed into mortar joint of masonry.
WRB (Weather resistive barrier)
The WRB should be installed starting at the bottom of the wall, overlapping the flashing and working upward. The WRB should overlap horizontally 2” to 4” and vertically a minimum of 6” in shingle fashion. Inside and outside corners must be overlapped a minimum of 16”. It is very important to wrap all corners with WRB layer and to overlap this on the flashing previously installed, as shown in Figure 1.
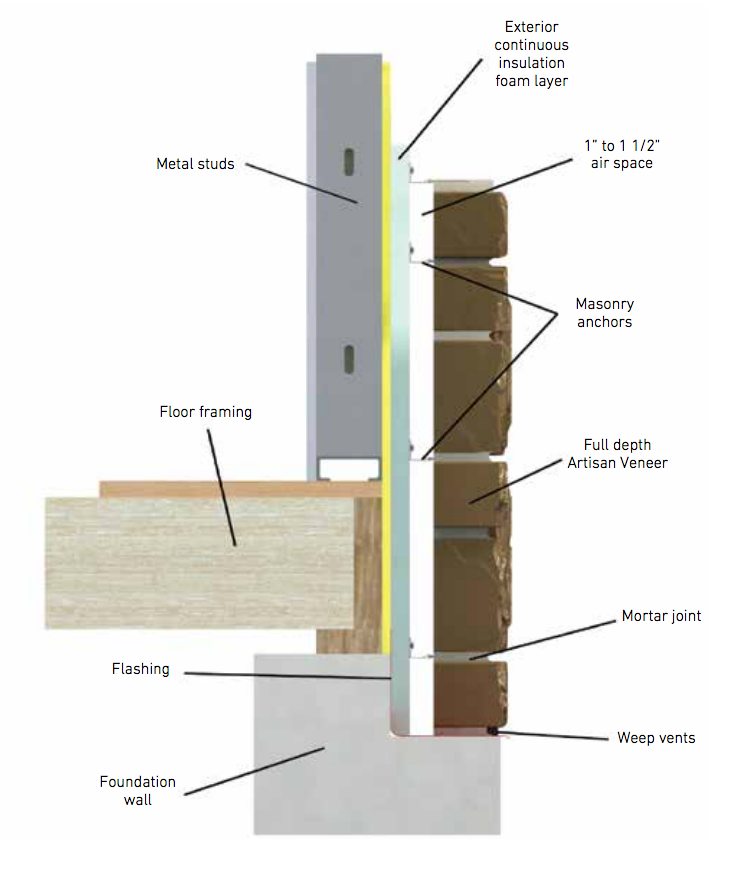
Exterior continuous insulation foam layer
The installation with an exterior continuous insulation has been conceived in order to meet and even exceed new energy code requirements. It involves installing a rigid foam sheathing or layer, in order to reduce heat loss, allow for continuous and uniform insulation and thus improve energy efficiency in the system. Insulation layer is installed over the WRB and is attached to the wall by masonry anchors and joint reinforcement.
Stone cuts
Make all unit cuts, including those for bonding, holes, boxes, etc., with motor driven masonry saws, using either in abrasive or diamond blade. The edge of a masonry trowel can be used to rough up cut edges which will restore a natural look to the stone. Cut neatly for best appearance.

STONE VENEER INSTALLATION PROCEDURE
Applying first course
Start installing full depth stone veneer on the horizontal surface of the foundation wall, which serves as a footing or ledge for supporting the wall (Figure 2). For installing the first course of veneers, apply mortar on the flashing previously installed in this area, then install stones in such a way that a 1” to 1½” airspace is left between the Insulation layer and the back of the veneer. Use the level and the string line to make straight, level courses, unless otherwise indicated.
For the first and all subsequent courses:
- Maintain mortar joint thickness between 3/8” and ½” for all full depth veneers (as specified before), both horizontally and vertically.
- Tool joints: Alternate lying of the stone to the same side so that the joints will minimize the appearance of repeating patterns. Shape the mortar joint to a concave profile.
Install weep vents in veneer masonry at maximum 24 inches (610 mm) on center horizontally above through-wall flashing, above shelf angles, lintels, bottom of walls, and elsewhere as indicated.
Placing, Bonding and Anchoring
Masonry must be applied in full bed of mortar with full head joints, properly jointed with other work. Buttering corners of joints, deep or excessive furrowing of mortar joints is not permitted.
- Back-bevel bed joints to remove excess mortar droppings in cavity as work progresses.
- Fully bond intersections and external corners.
- Isolate masonry partitions from vertical structural framing members with a control joint as indicated.
- Provide for expansion and control joints as indicated.
- Do not adjust masonry units after placing. Where resetting of masonry is required, remove clean units and reset in new mortar.
- Leave joints under shelf angles and elsewhere as indicated or required open to receive sealant.
- Masonry backing: wire anchors or adjustable anchors. Minimum spacing 16” horizontally and vertically.
- Increase quantity of wall anchors around perimeter of openings, at wall terminations and corners, and along parapet walls, placed within 8” of openings and edges of masonry.
Installing subsequent courses
Assemble adjustable anchors to the horizontal joint reinforcement (embedded in the CMU wall). NOTE: All subsequent images show installation steps using Waterford Stone™, but procedure is equivalent for Dufferin®, Lamina® and Cinco® Stones as well.
Continue installation working your way from the bottom horizontally up the wall. Prevent grout, mortar, and soil from staining face of masonry; if dripping occurs, remove grout and mortar from these surfaces immediately. See Figure 3.
You will also need to:
- Build-in items furnished by other trades, and leave accurate openings necessary for installation of other work to maintain required strength and appearance of masonry construction.
- Fill solidly with mortar around conduit and sleeves passing through masonry work.
- Build-in loose steel angle lintels, providing bearing indicated in full mortar bed.
- Protect base of masonry walls from rain splashed mud and mortar splatters.
- Do not permit mortar to drop or accumulate into cavity air space or to plug weeps.
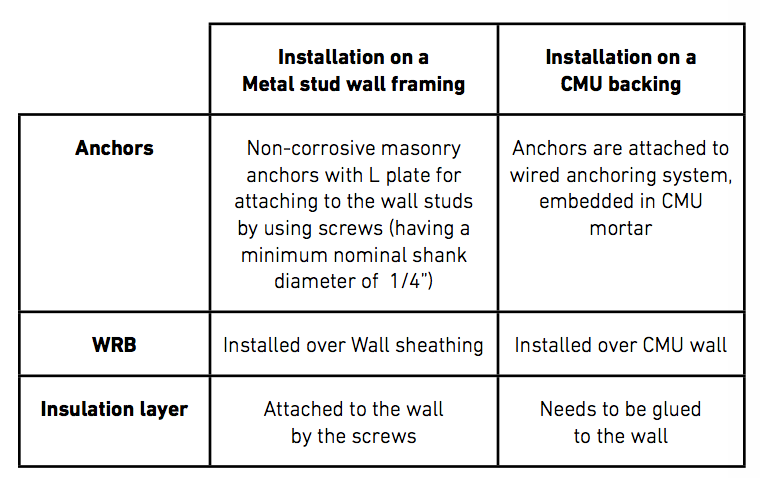
Installing stone veneer on a metal stud wall framing
Wall frames should use 1½” x 3½” metal studs, spaced no more than 24” CC and covered by a ½” or 5/8” thick sheathing. As with different brick sizes, the depth of the exterior trim and footing or ledge will need to allow adequate depth for the stone plus air space (typically 4½” to 5”). Consult your local building code for specific requirements on footing/ledge and air space. Materials, tools, preparation and installation procedures for installation on a wall framing are equivalent for those used in an installation on a Concrete Masonry Unit (CMU) backing. There exist some minor differences:
INSPECTION OF STONE VENEER
The facing shall be free from chips, cracks, crazes or any other imperfection that would detract from the overall appearance of the finished wall when viewed from a distance of 15’ at right angles to the wall with normal lighting.
HOW TO CLEAN STONE VENEER
The following considerations should be followed for proper cleaning:
- Do not use high-pressure washers, acid or acid-base cleaners or bleach.
- Use a detergent masonry cleaner without acid, following manufacturer’s instructions for dilution ratios and cleaning.
- Start at the top of the wall, applying solution to a wet area using a soft bristle brush.
- Make sure to rinse thoroughly with clean water, removing all solution and residue.
- Replace defective mortar as required to match adjacent work.
- Do not allow excess mortar lumps or smears to harden on the finished surfaces.
- After mortar is thoroughly set and cured, clean masonry as per methods recommended by NCMA. Harsh cleaning methods after walls have been erected may mar the surface of the units.
PROPER MAINTENANCE OF STONE VENEER
Full depth Artisan Stone Veneer, when properly installed and cleaned, needs virtually no maintenance other than routine cleaning with standard commercial grade cleaning agents. Graffiti, paint or dye stains may need special cleaning methods and products. Contact manufacturer for specific cleaning recommendations.
INSTALLATION RECOMMENDATIONS
- A complimentary or matching mortar color is recommended.
- A water repellent mortar additive is highly recommended for all exterior walls.
- Control joint spacing should be approximately 20’ -25’ max., located at inside corners, 2-4’ from outside corners, wall height changes and at one or both sides of windows or large openings.
- To test correct mortar consistency, it should hang from trowel when held at a 90 degree angle.
PROTECTIONS
Remove temporary coverings and protection of adjacent work areas. Repair or replace damaged installed products. Protect installed products until completion of project. Protect concrete stone from contact with mortar, soil, and other materials capable of staining or discoloring the product.
LIMITATIONS OF STONE VENEER
- The facing is not intended for use as an impervious surface.
- Muriatic acid should not be used as a cleaning agent or in direct contact with the facing.
- The facing should not be continuously exposed to temperatures above 250° F (120 C)
Stay Connected
Get the latest news and information from Echelon by signing up to receive our monthly newsletter.